An Ultimate Guide to Use WooCommerce for Beginners

The Internet has emerged as a potent tool to sell products and services online over the past few years. From big enterprises to smaller businesses to home-based entrepreneurs, everyone is now selling something or the other online, whether or not their core business is eCommerce.
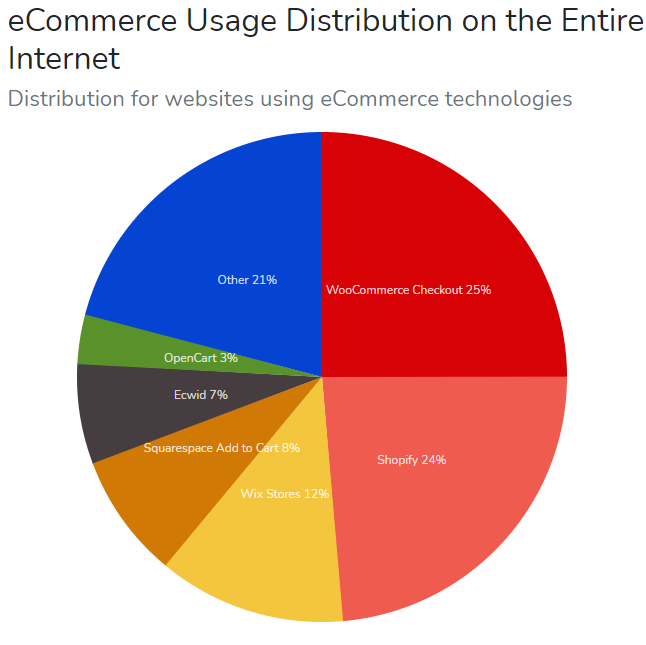
The constantly growing popularity of online shopping has led to the rise of several eCommerce platforms, of which WooCommerce, Shopify, and Magento are the main. However, WooCommerce has always been the top choice for businesses or individuals already on WordPress to bring eCommerce functionality to their sites. The platform powers at least 5+ million online WordPress stores and tops the list of eCommerce platforms with a 25% market share.
The reason? WooCommerce has much deeper integration with WordPress than any other eCommerce platform. Besides, it also offers both simplicity and great customization. But, if you want to unlock the true potential of this most flexible eCommerce platform, ensure you read this ultimate WooCommerce guide first!
What is WooCommerce?
It is a highly flexible and customizable, open-source eCommerce platform available as a plugin for WordPress. It facilitates you to add eCommerce functionality to your WordPress website to sell products and services online.
Is WooCommerce free to use?
Just like WordPress, the plugin is free to use. However, it can’t get off of the ground without a domain name and a hosting service. You may also need to pay for some extensions if you need additional functionality.
What is the use of WooCommerce?
The main premise of using the plugin is to help you sell anything through your WordPress site. Although it’s primarily used to sell physical products like jewelry, clothes, etc., you can also use the plugin to sell digital products like eBooks, software, courses, etc.
How safe is WooCommerce?
While the platform is secure by itself and offers adequate transactional security, store owners need to be constantly on the alert. It does provide enough overall protection to defend you against external cybersecurity threats, such as hacking and brute force attacks.
Are WooCommerce payments secure?
WooCommerce payments, the platform’s own native payment system, is highly secure. It never stores a customer’s credit card number and security code on your website and supports 3D Secure to add an extra verification step for payments.
Who uses WooCommerce?
The most common users of the plugin are small to large-sized online merchants using WordPress. From individuals who want to sell handmade one-of-a-kind products online to large corporations looking to modernize their online presence, everyone is now using it. Many of the world’s top brands use it, including Entrepreneur.com, Rough Guides, Harley Davidson, and London Evening Standard.
How long does it take to set up WooCommerce?
It depends mainly on the size of the store. An average small store generally takes about 20 hours, whereas larger projects may go anywhere between 40–80 hours to set up.
What is the difference between Shopify and WooCommerce?
Shopify is a fully-hosted eCommerce platform where you pay a flat fee per month for a plan that includes hosting, backups, maintenance, and security. On the other hand, WooCommerce is an open-source plugin for the WordPress platform where you’re required to pay for a hosting account, domain name, SSL Certificate separately to start an online store.
Can I use WooCommerce without WordPress?
No, you can’t use it without WordPress. You must have to install it on your WordPress site to set up and run an online store.
Who owns WooCommerce?
Automattic Inc., the parent company of the WordPress platform, owns the plugin. The company acquired it for a reported $30 million in 2015.
Can WooCommerce handle 50000 products?
Yes. If properly configured, the plugin can handle 50K, 100K, or even more products. According to WordPress, it can hold up to 1 million products with some changes to storage.
How to use WooCommerce?
Using the plugin is as simple as you think. All you’ve to do is follow the steps given below:
- Install and activate the plugin the way you would any other WordPress plugin.
- Pick a theme for your shop.
- Choose a currency, shipping, payment gateway, and set up taxes.
- Add products to your store.
- Add relevant extensions to expand the functionality of your store, if required.
If you’re new to the plugin, don’t try to do everything at once. Start small with your store and work your way up.
How does WooCommerce work?
WooCommerce is an eCommerce plugin built on top of WordPress. It allows you to turn your ordinary WordPress site into a full-fledged eCommerce store. If you install and activate the plugin, you can add checkout options, products, and a shopping cart to your WordPress site to sell physical or digital products and services.
Does WooCommerce work with Square?
Yes. You can use Square, a popular point of sales software, in your store to accept and process both online and offline payments. With Square, you can easily track and manage both in-person and online payments in one centralized place.
How does WooCommerce shipping work?
In short, when setting up your store, shipping works something like this:
- Set up shipping zones, i.e., locations, such as the United States
- Add methods to those zones, such as Free Shipping or Local Pickup
- Apply rates to your methods
How to add a custom add to cart button in WooCommerce?
You can use the popular Custom Add To Cart Button plugin to customize the add to cart button to your taste.
After installing and activating the plugin, go to Appearance >> Customizer >> WooCommerce >> Add to Cart Buttons and choose from the options for custom add to cart buttons. You can also hire a WooCommerce development expert to add a custom add to cart button to your online store.
How to add video in product gallery in WooCommerce?
You can use any of the following WordPress plugins to add video in the product gallery in your store:
- Product Video Gallery plugin (Free)
- Add Featured Video in Product Gallery ($49, billed annually)
- Product Video ($49, billed annually)
- WooThumbs ($79/year)
How to add a view cart button in WooCommerce?
As per the platform’s default flow, the view cart button is displayed after the customer presses the Add to Cart button. If you still need to add the view cart button, use the following HTML code wherever you want the button to show:
<div style=”text-align: right;”>
<p>
<a href=”http://site_name/shop/cart/” class=”button”>View Cart
<a href=”http://site_name/shop/checkout/” class=”button checkout”>Checkout
</p>
</div>
How to change the payment method on WooCommerce?
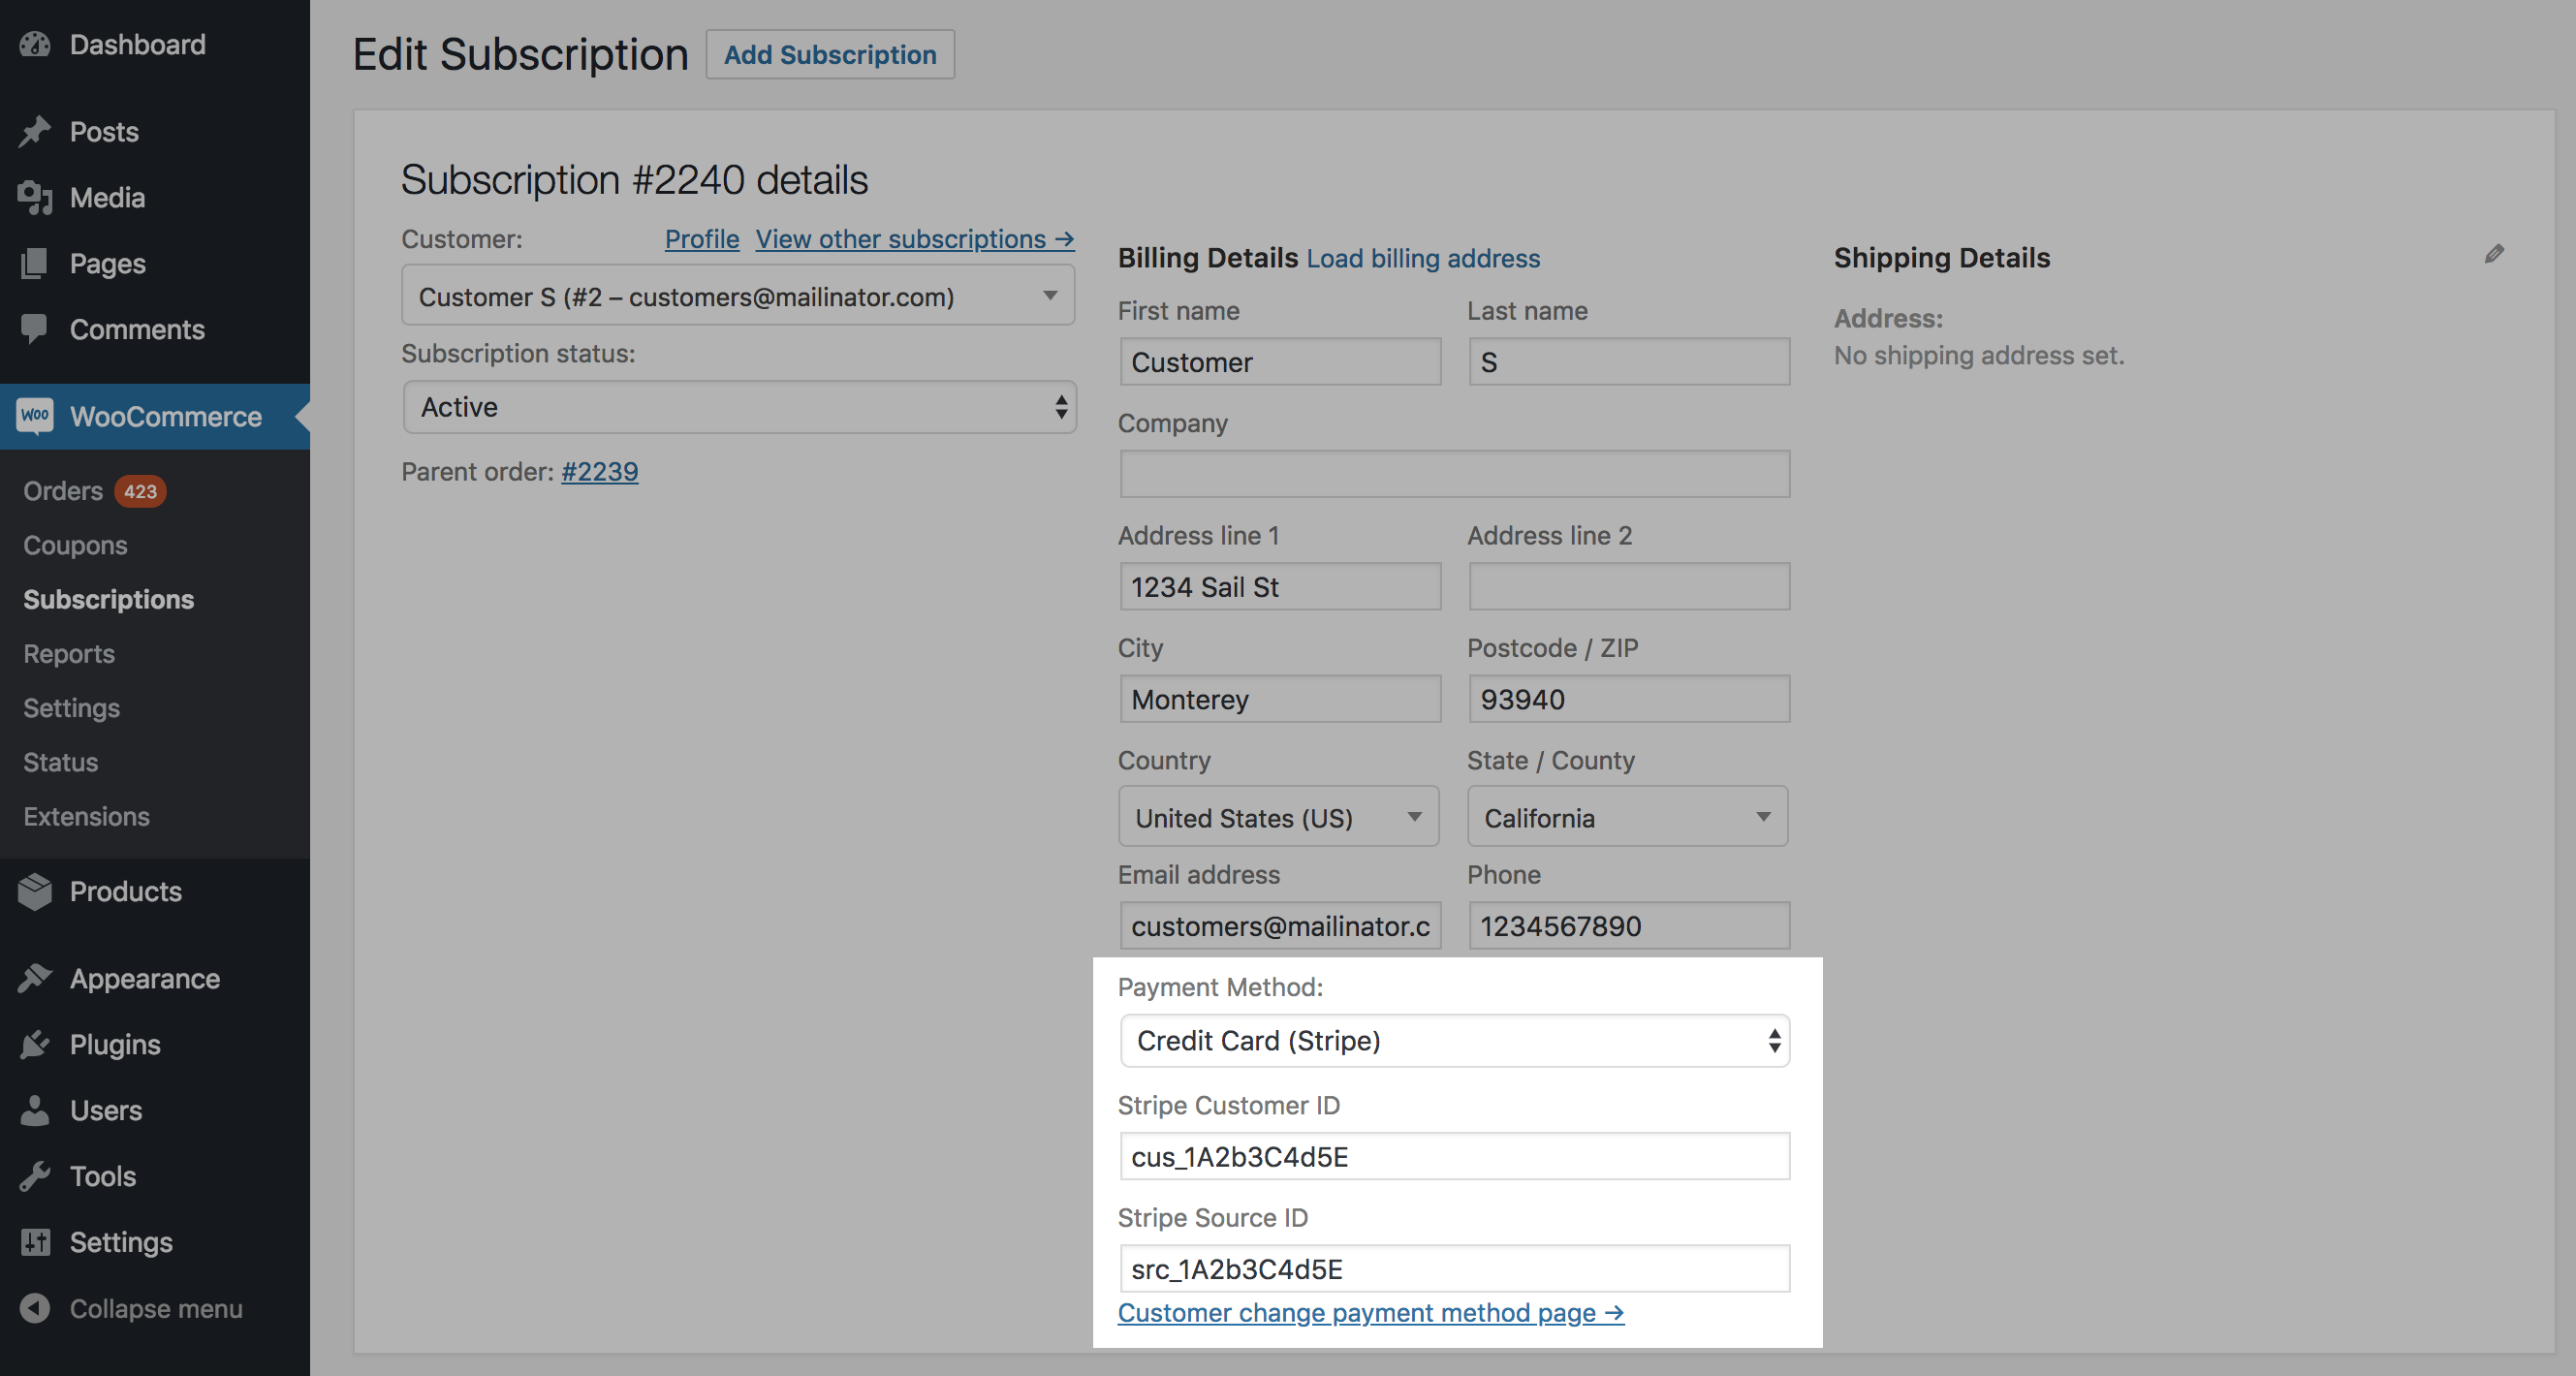
In subscription models, you may need to change the payment method for various reasons, like an expired credit card. To change a subscription’s payment method, follow the steps given below:
- Navigate to WooCommerce >> Subscriptions in your Dashboard.
- Then, click the specific ID of the subscription. This will open the Edit Subscriptions administration screen.
- After that, click the pencil icon next to the Billing Details section.
- Finally, go to the dropdown menu to change the Payment Method.
How to change the return to shop link in WooCommerce?
You can use the following snippet of code to change the return to shop URL:
add_filter( ‘woocommerce_return_to_shop_redirect’, ‘wc_empty_cart_redirect_url’ );
function wc_empty_cart_redirect_url() {
return ‘http://yoursite.com/sample-page/’;
}
The callback function will redirect the URL to the page that is inside this function. So don’t forget to replace the http://yoursite.com/sample-page/ with the URL you want users to redirect to.
And if you wish to dynamically return users to the home page, replace the return value in the code above with home_ url():
function wc_empty_cart_redirect_url() {
return home_url();
}
How to connect WooCommerce to PayPal?
First, install and activate the PayPal Checkout or PayPal Payments plugin to connect the eCommerce platform to PayPal. Then, go to WooCommerce >> Settings >> Payments and use the toggle next to PayPal Checkout to Enable it.
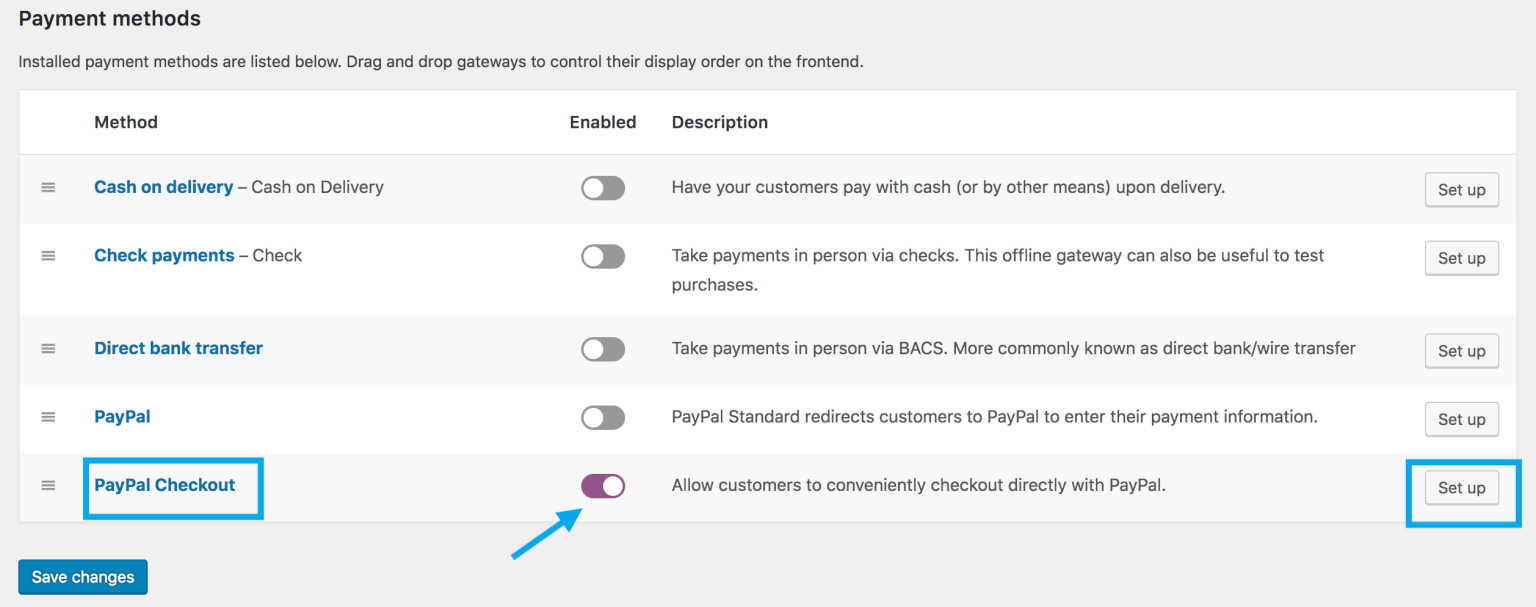
After that, click Set up or Manage to configure your settings. For more information, you can follow this official page.
How to create an eCommerce website using WooCommerce?
To create an eCommerce website with this eCommerce plugin, follow the steps given below:
- Create a WordPress site if you already don’t have one.
- Install, activate, and set up the plugin.
- Choose a perfect theme.
- Choose a currency, shipping, payment gateway, and set up taxes.
- Add products to your store.
- Install additional extensions to extend the functionality of your store if required.
How to delete all products from WooCommerce?
To delete all products from your store:
- Go to Products >> All Products.
- Then, click on Bulk Actions, select Move to Trash, and click Apply.
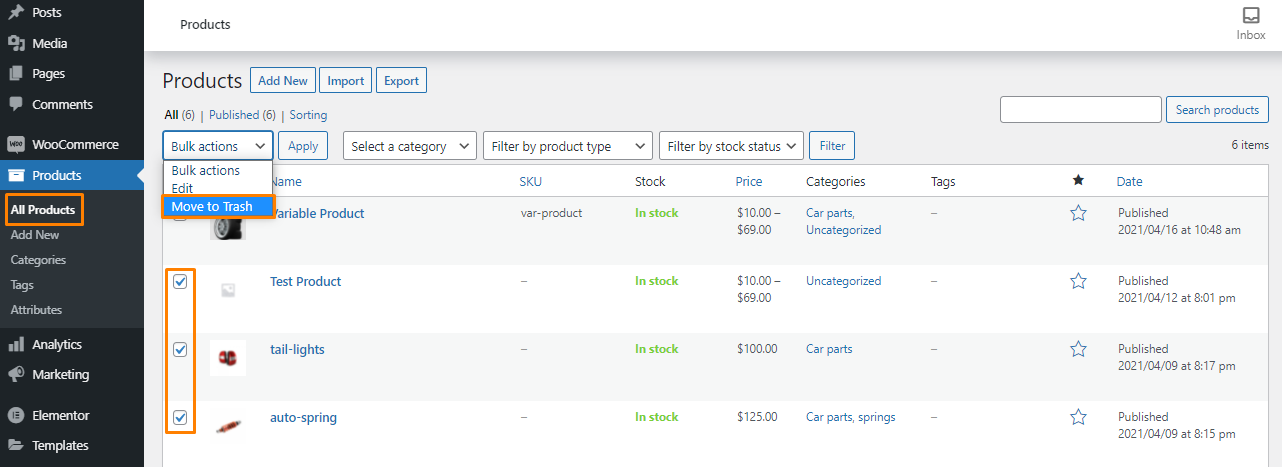
However, this process can be very tedious if you have too many products. In that case, run this SQL command to bulk delete products.
DELETE relations.*, taxes.*, terms.*
FROM wp_term_relationships AS relations
INNER JOIN wp_term_taxonomy AS taxes
ON relations.term_taxonomy_id=taxes.term_taxonomy_id
INNER JOIN wp_terms AS terms
ON taxes.term_id=terms.term_id
WHERE object_id IN (SELECT ID FROM wp_posts WHERE post_type IN (‘product’,’product_variation’));
DELETE FROM wp_postmeta WHERE post_id IN (SELECT ID FROM wp_posts WHERE post_type IN (‘product’,’product_variation’));
DELETE FROM wp_posts WHERE post_type IN (‘product’,’product_variation’);
This command will delete all the products from your store.
How to display product attributes in WooCommerce?
You can follow the steps given below to show attributes on the product page:
- Go to Products and edit an existing product or add a new one.
- In the Product Data section, select the Attributes tab.
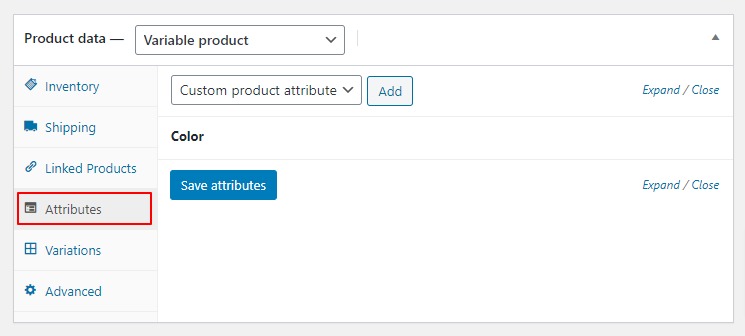
- Select your newly added attribute in the Custom product attribute dropdown and click Add.
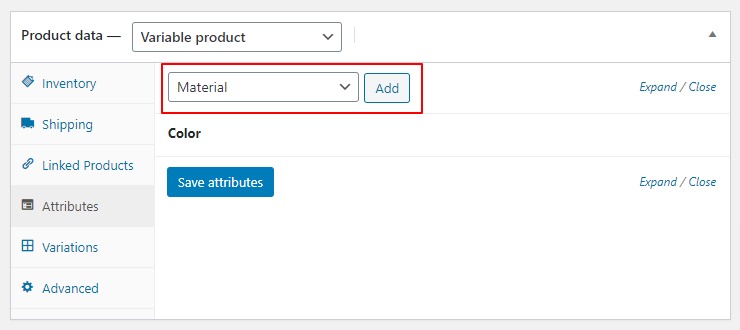
- Click the Value(s) box and add the ‘terms’ you created earlier to your product.
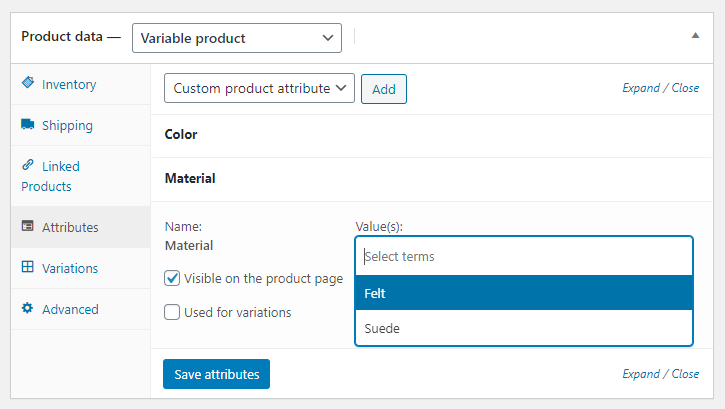
- Finally, click Save attributes and Publish or Update your product.
That’s it! The product attributes you’ve created will start showing on your selected product pages.
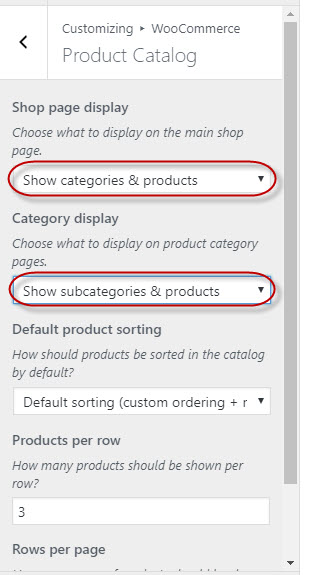
How to display a product category in WooCommerce?
To display a product category:
- Go to WooCommerce >> Settings.
- Select the Products tab and choose the Display option.
- Select Show both for the Shop Page Display and Category display options.
How to display WooCommerce products by category in WordPress?
Most WooCommece themes allow you to navigate to your categories. You can customize the way they are featured by going to Appearance >> Customize in your WordPress Dashboard. However, if your theme doesn’t offer this functionality, you can use the following query to show products by a specific category:
$args = array(
‘post_type’ => ‘product’,
‘posts_per_page’ => 10,
‘product_cat’ => ‘bags’
);
$loop = new WP_Query( $args );
while ( $loop->have_posts() ) : $loop->the_post();
global $product;
echo ‘<br /><a href=”‘.get_permalink().'”>’ . woocommerce_get_product_thumbnail().’ ‘.get_the_title().'</a>’;
endwhile;
wp_reset_query();
How to edit WooCommerce shortcodes?
Editing a shortcode in WordPress requires coding knowledge. Therefore, it’s highly recommended you hire a WordPress expert to edit your shortcodes.
How to edit the WooCommerce sidebar?
You can edit the sidebar right from your WordPress Dashboard. Simply go to Appearance >> Widgets and find the Sidebar section. Click to expand the Sidebar section, and you’ll be able to view all the widgets that make up that particular sidebar. You can then rearrange those widgets to customize your sidebar.
How to get shop page URL in WooCommerce?
You can get the shop page URL with the following code:
$shop_page_url = get_permalink( woocommerce_get_page_id( ‘shop’ ) );
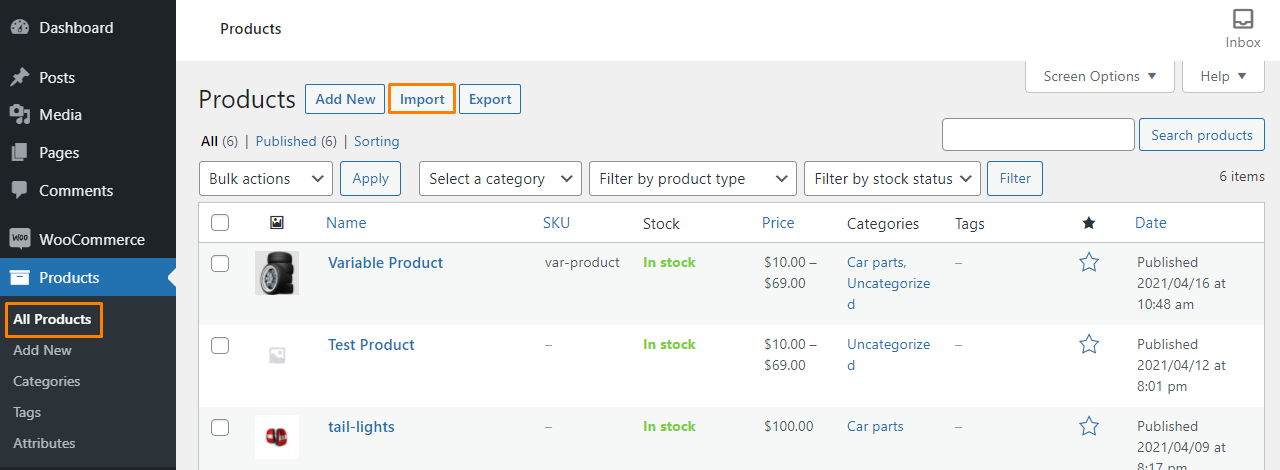
How to import products to WooCommerce?
Go to Products >> All Products and click the Import button to upload a product list in CSV format.
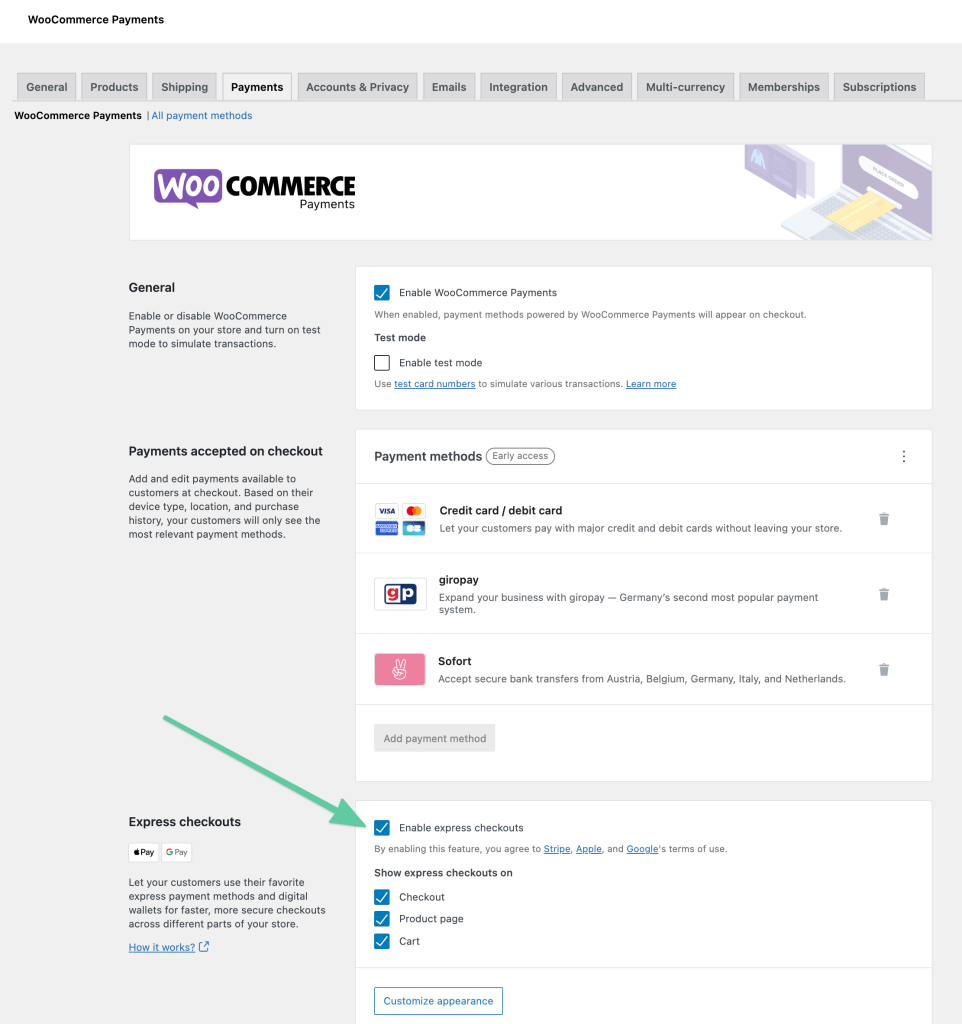
How to integrate Google Pay in WooCommerce?
The easiest way to enable Google Pay is via WooCommerce Payments. Select the checkbox for “Enable express checkouts” under Settings >> Payments, and you’ll be enabling both Google Pay and Apple Pay.
How to print shipping labels in WooCommerce?
You can use the Shipping extension to create and print shipping labels. For more information, follow this official guide on automating your shipping label process.
How to set up Authorize.net on WooCommerce?
You can use the Authorize.Net extension to set up Authorize.Net on your store. After you install and configure the extension, follow this guide.
How to set up Paytm payment gateway in WooCommerce?
The first step to set up the Paytm payment gateway on your store is to install the official Paytm plugin.
After activating the Paytm plugin, navigate to WooCommerce >> Settings in your Dashboard and click the Checkout/Payment Gateways tab.
Then, scroll down to the Checkout page and navigate to Paytm settings under Gateway Display.
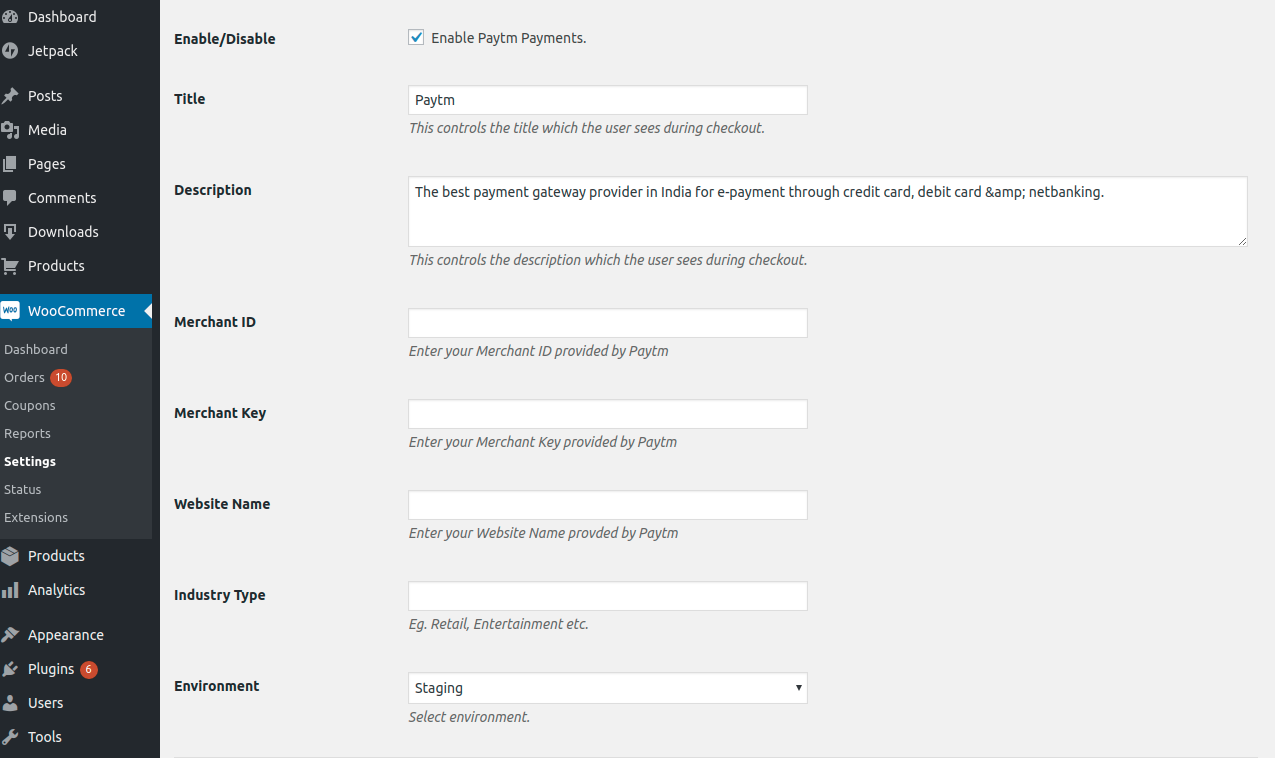
Click on Paytm to edit the setting, fill in the required credentials, and click Save changes. That’s it!
How to set up WooCommerce for dropshipping?
The Dropshipping extension offers you everything you need to set up a dropshipping store with the platform. Getting started only requires a few steps:
- Install and activate the extension.
- Add suppliers to your store.
- Assign products to suppliers.
- If applicable, import supplier inventory.
- Enable email notifications.
- Choose a payment gateway.
- Set up taxes.
- Launch your dropshipping store.
How to set up WooCommerce my account page?
If you log in to your store via the My Account page, you’ll be shown the default My Account Dashboard after login, where you can find links to other sections on the left side.
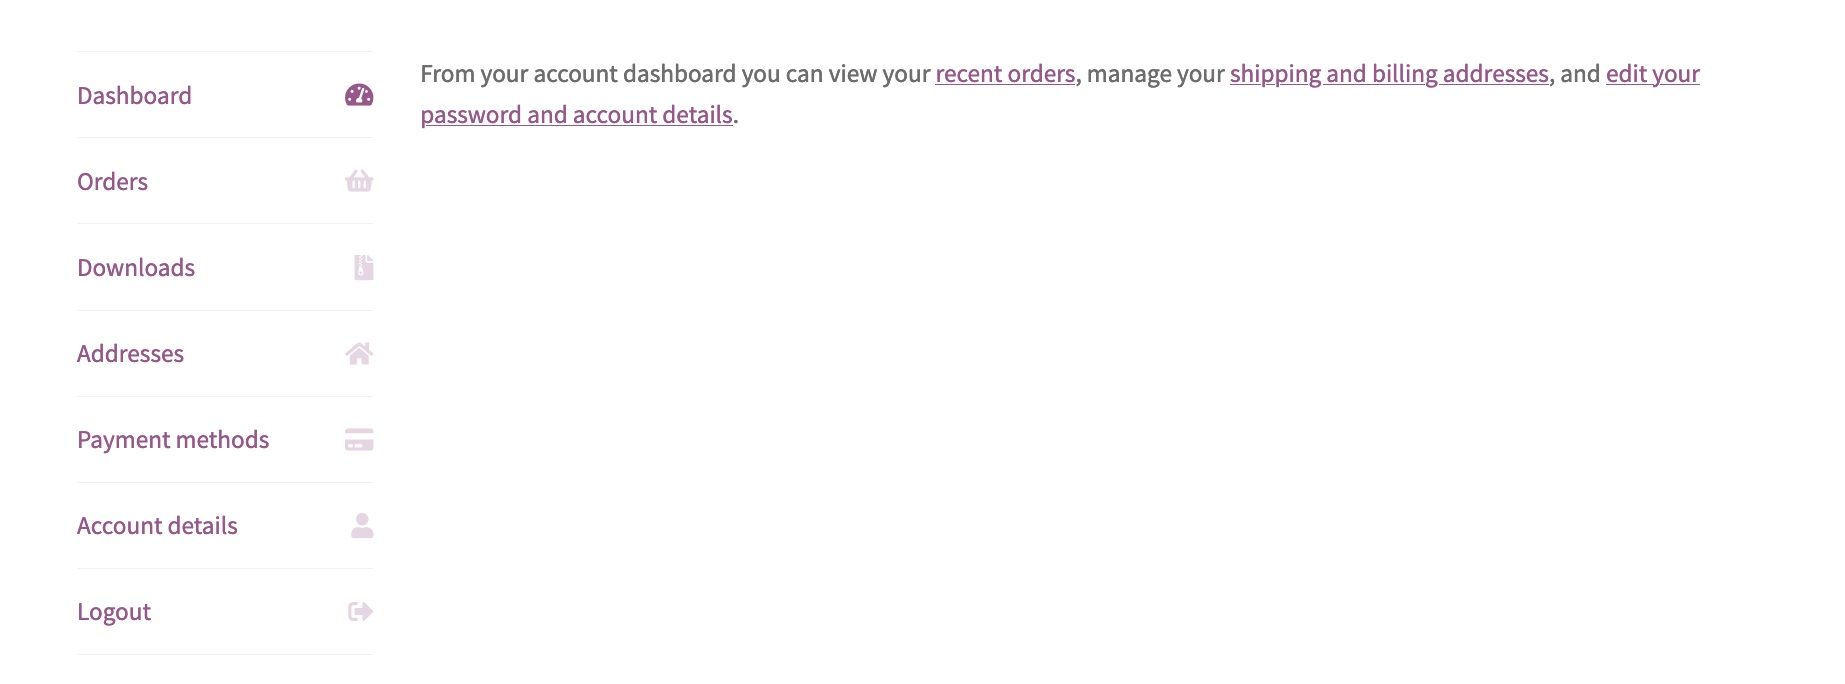
Fill in the required details in all sections to set up your default my account page. You can also use plugins to add extra sections here if required.
How to update WooCommerce subscriptions?
Go to WooCommerce >> Subscriptions to update an existing subscription. Click the ID of the subscription you want to edit, and you’ll be redirected to the Edit Subscriptions screen.
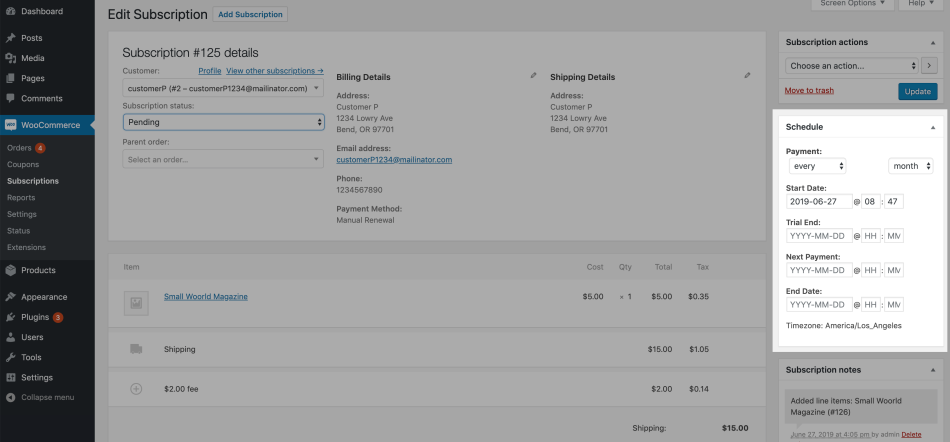
Modify the details as required and Update.
Is WooCommerce compatible with Elementor?
Yes. Both Free and Pro versions of the Elementor website builder are 100% compatible with the platform.
How to add a cart icon in WooCommerce?
You can use plugins, such as Menu Cart or Max Mega Menu, to add a cart icon to a menu bar.
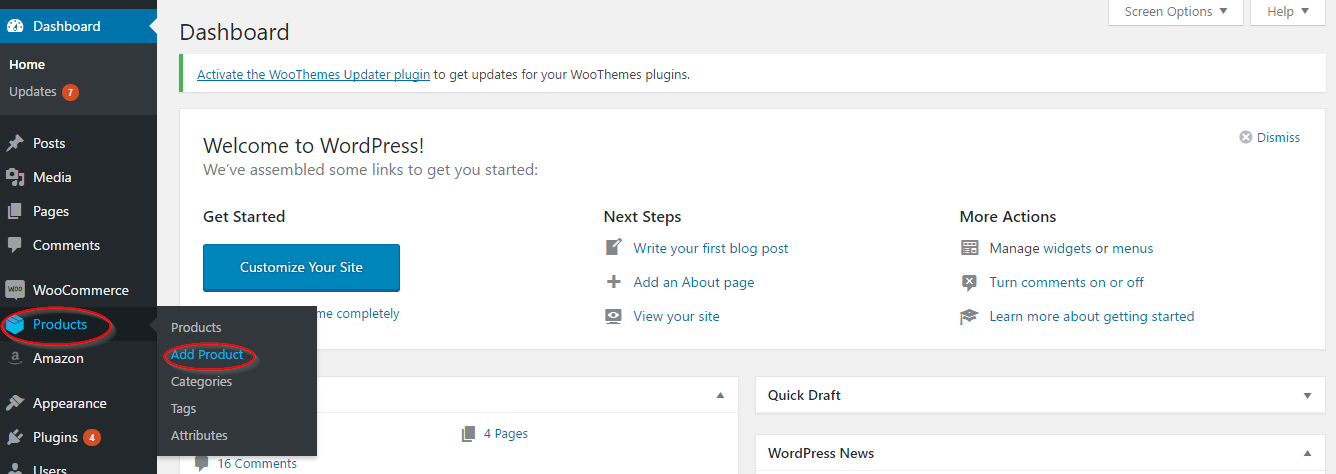
How to add products in WooCommerce?
If you’re a new merchant, go to WooCommerce >> Products and click the Create Product button to add your product.
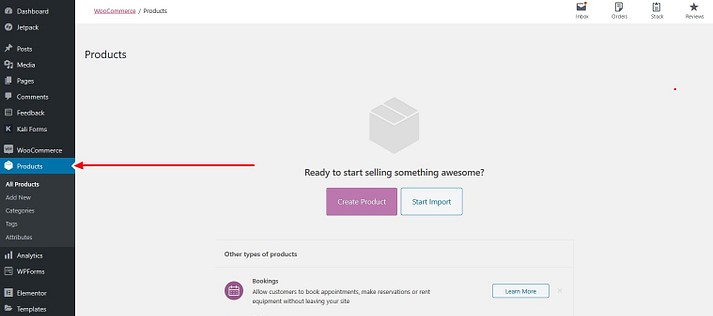
But, if you have already added a few products to your store in the past, you’ll have to click the Add Product link to add new products.
How to add the WooCommerce checkout page?
The plugin automatically creates and assigns a checkout page when you first set up your online store. It looks something like this:
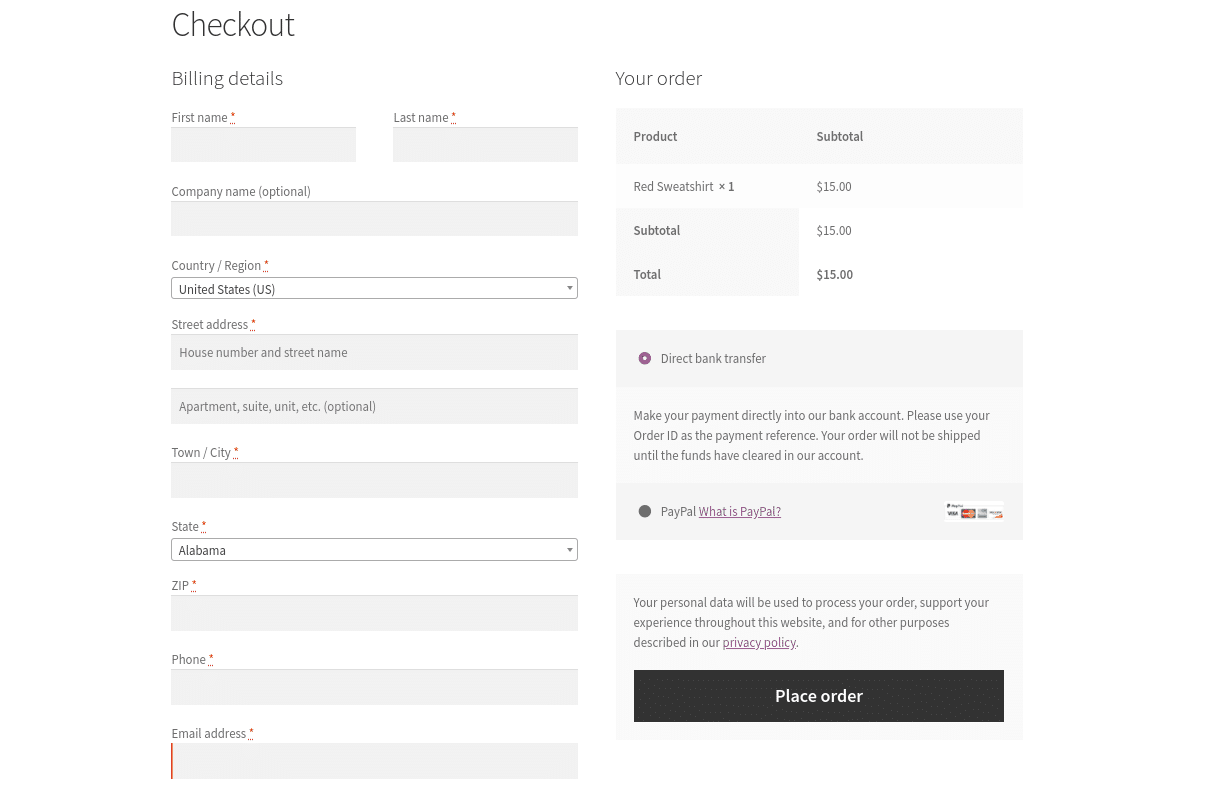
You can further optimize it with various extensions and plugins for better conversions if required.
How to connect WooCommerce to Facebook?
You can connect the platform to Facebook using any of these plugins:
After installing any of the above plugins, you’ll need to create a Facebook product catalog and synchronize it with your online store. Simply follow these steps:
- Go to the Catalog manager in your Facebook account and select Create a catalog.
- Pick the right catalog type from your inventory and click Next. You can choose from Travel, eCommerce, Cars, Real Estate, etc.
- Select the Connect eCommerce platform option
- In the dropdown menu, choose the business to which the catalog belongs.
- Enter a name for the catalog, press Create, and that’s it!
How to edit the WooCommerce product page template?
There are two main files responsible for the output of the product page:
- content-single-product.php: It prints the content in the template.
- single-product.php: It builds the template for the current layout.
You can overwrite both template files using a child theme. However, you should prefer using Hooks wherever possible because WordPress recommends this practice for customization. Edit the template files only for complex customizations. With the right combination of both techniques, you can achieve nearly any customization you want.
How to install a WooCommerce theme?
Installing a WooCommerce theme is similar to installing a regular WordPress theme. Here are the steps you need to follow to get your new theme up and running:
- Visit the official themes library and download your favorite theme in .zip format.
- Once the theme has been downloaded, navigate to Appearance >> Themes in your WordPress Dashboard and click the Add New button.
- Click Upload Theme to upload the .zip file.
- Click Choose File, select the theme’s .zip file from your computer and click Install Now.
- After installing your theme, you may see an alert to download the WooThemes Helper plugin to receive easy updates. Add the activation key if required.
- After activating the theme, visit the specific theme’s documentation to configure your selection properly.
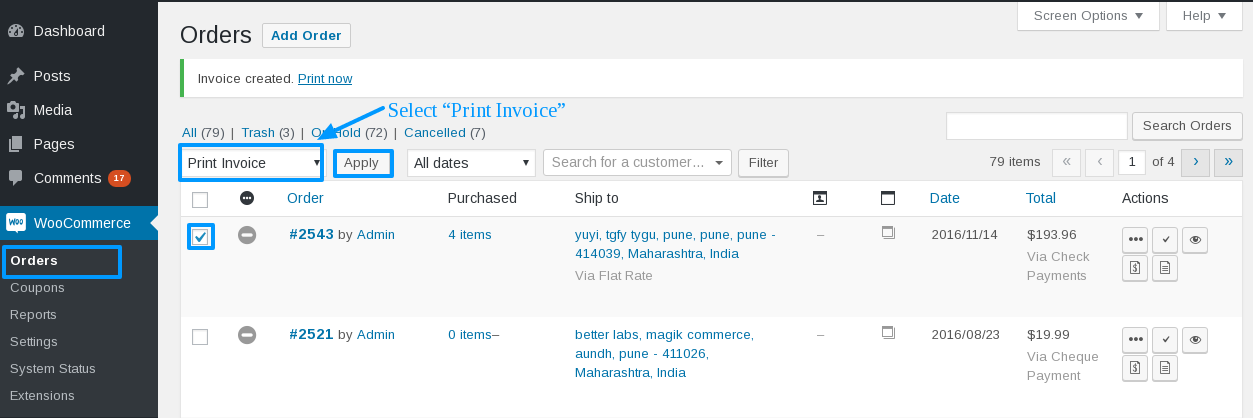
How to print invoices in WooCommerce?
You can use the free Print Invoice & Delivery Notes plugin to quickly print invoices and packing lists for orders. After you activate the plugin, follow the steps given below:
- Go to WooCommerce >> Orders.
- Select the order(s) that you want to print.
- From the Bulk actions, select “Print Invoice” and hit Apply.
How to set up Stripe for WooCommerce?
The easiest way to connect Stripe is by installing the Stripe Payment Gateway plugin. After activating the plugin, navigate to WooCommerce >> Settings, select the Checkout tab, and click the Stripe link.
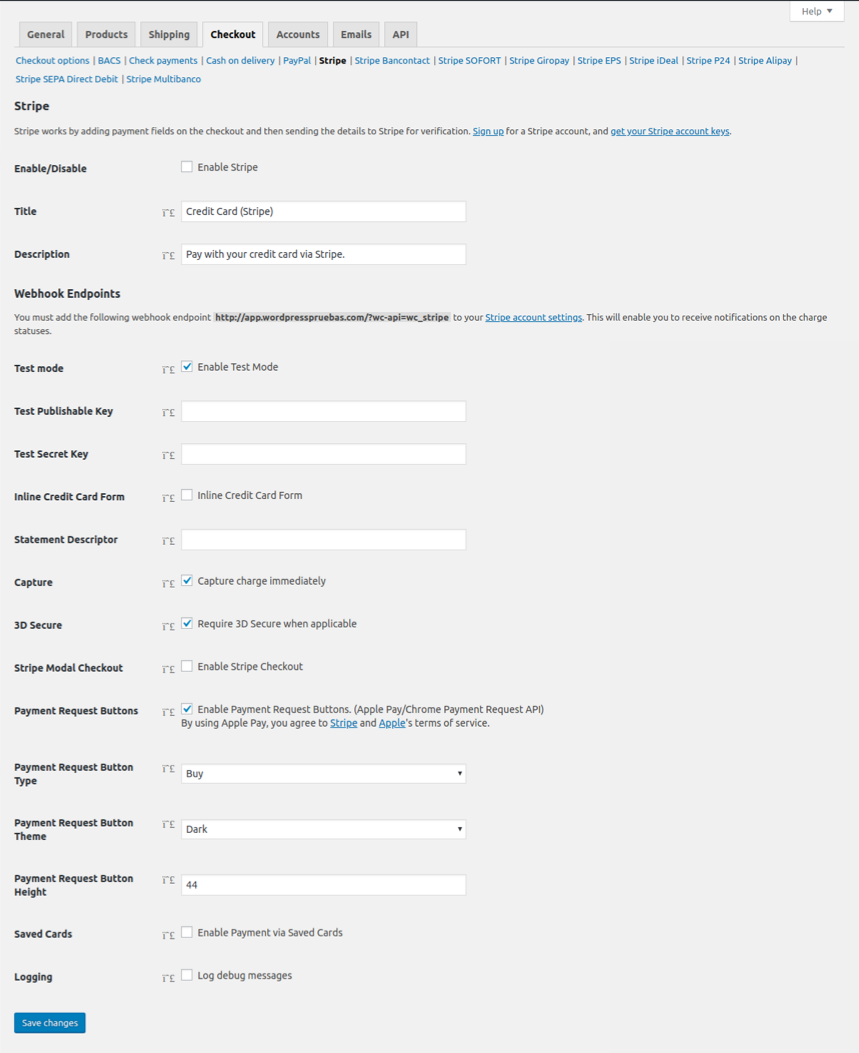
Configure your settings and click Save changes.
What is the best free WooCommerce theme?
The best theme is the one that can offer you at least the following:
- Professional, high-quality design
- Deep integration with the platform
- No theme bloat
- Fully responsive design
- Loads quickly
- Optimized for search engines
- Work seamlessly with extensions
- Easy to use and flexible
- Gets regular updates
- Support and documentation
- Positive reviews and high ratings
To ensure you make the right choice, consider going through our guide on finding the best theme for your store.
What is the difference between WordPress and WooCommerce?
WordPress is a standalone content management system (CMS) that allows you to build websites or blogs. On the other hand, WooCommerce is a plugin you install on your WordPress site or blog to bring eCommerce functionality.
What is the difference between eCommerce and WooCommerce?
eCommerce is all about buying and selling products and services online. On the contrary, WooCommerce is a free WordPress eCommerce plugin that turns your ordinary website or blog into a fully functional online shop.
How to disable shipping in WooCommerce?
Follow the steps given below to disable shipping:
- Go to WooCommerce >> Settings in your Dashboard.
- Find and open the “Shipping” tab.
- Edit your Zone
- Click to “OFF” toggle button.” That’s It.
That’s all for now! Hopefully, this ultimate WooCommerce guide covers all the major areas of running a successful online store. Once you’ve finished reading this guide, you would have learned almost everything there is to know about building, deploying, and managing an online shop with WooCommerce. If ever you get stuck, we are always here to respond to your queries quickly.